In a galaxy far, far away.

A long time ago… I cut over 1000 little squares.

Back in 2008, I had wanted to dip my toes into quilting and so I started a hand-pieced quilt (more on that soon). In short order, mom convinced me to give machine piecing a try. I quickly sewed up a Turning Twenty quilt top and was over-excited about my new hobby. (I know, hard to imagine) I went right out and purchased fabric for my next quilt and cut all the fabric

I got discouraged on the Turning Twenty quilt soon after which left me packing all of my quilting supplies up and not touching any of it again for years and years.

Fast forward to 2016 – I happened upon all of my old quilting stuff at mom’s and decided to finish up that old quilt top. You can read its full story here, but we’re here to talk about all those squares. I was just getting back into sewing at that point, so I sewed up a few squares in what I thought the pattern had been.

Now, for some of my first sewing in nearly a decade that’s pretty darned good. I wanted to practice more before I tackled this one and honestly, I was pretty daunted by all those squares. I still think it’s a bit intimidating – I’ve made a nine patch quilt. So I packed it up again.

Now we’re in present day and you may recall that I found this quilt again a few months back. Now seemed like the perfect time to tackle this monster. I’ve got a good number of quilts under my belt and it is the year of wips, after all. The big problem here was that I was reasonably sure that the sample blocks I had made in 2016 weren’t the right pattern.

I do have vague memories of what the pattern book looked like but it seems to be long gone from mine or mom’s possession. So I turned to a bit of math influenced brainstorming. I had conveniently written the quantities of each size square: 560 dark 2.5″ squares, 420 light 2.5″ squares, and 140 each light and dark 2 7/8″ squares. After figuring out that the 2 7/8″ squares would be used for two-at-a-time HSTS, we were on our way.

I brainstormed, I mathed, I looked up countless nine-patch variations until finally, I had it! This is called a split nine patch, though that is also conveniently what the other, wrong sample block is called but that’s quilt patterns for you. With that sorted, I decided to use these squares as leaders and enders for my sewing projects.

I sorted all the squares in a serious effort to have the fabrics well distributed. Whenever I was sewing a quarter inch seam, I sewed two 2.5″ squares together. When I was doing anything else, like snowballing or flying geese, I did the HSTs. I made quite a bit of progress that way.

Last weekend, I decided to to just get cracking and try to get the top finished. The first step was to deconstruct those old blocks so my seam ripper and I had a nice little party. With that done, I really got moving – chain piecing is so satisfying when you have a good audiobook, a hot cup of coffee, and endless seams to sew.

Now, I’m a big fan of nesting seams so I’ve divided everything into two sets of blocks – “in” and “out.” I press all the in-block seams toward the middle and the out-block seams toward the external squares. Since the piecing is all identical, all you have to do is alternate ins and outs and voila! Nested seams. I made 70 in blocks first:

And then I made 70 more…

Finally, I was ready to start laying them out. I think the original pattern I picked out was set in furrows, but I decided to try something with a bit more pizazz.

It took me forever to lay this out! I also got the in’s and out’s confused more times than I’d like to admit. I honestly didn’t worry too much about fabrics being next to one another. The only swaps I made in the layout were to distribute that gold a little bit. I really don’t love assembling quilts, so it took me a few more weeks to get it done, but now it’s a quilt top!

I can’t believe it’s done! I have to say, I don’t think I’d choose these fabrics today, but the finished top is pretty amazing. I’m so proud of myself for getting this one done finally! This is finish 11 of 19 for my year of WIPs (#10 is a gift, so you’ll see it way later) – we’re over halfway there!

All in all, I’m very proud of how well this one came out. One of the biggest things I think I’ve learned over the last 13 years is that, for me, finished is better than perfect. I do my best and in the end my quilts always look good enough to snuggle under.


#yearofwips projects finished: 11 of 19


Happy making!

Scraptastic.

I have long admired the scrappy look. I love a bit of whimsy and bright, fun colors and patterns, but have been a little nervous about trying to pull it off myself. Enter the Homespun Quilt. A dear friend invited me to join her in the quilt-along and so I spent some time looking at other quilters versions, when I stumbled upon a rainbow scrappy version. It was so fun and so pretty, I knew that had to be it.

I spent a good deal of time going through my scrap baskets, trying to decide whether to do 9 or 16 blocks… I went with 12. I would up changing it up a wee bit halfway through, switching from doing 2 aquas to 2 greens. Anyway, my sewing room has been covered up in scraps for about a month.

And then I decided it should be full on scrappy, so I dove into the low volume scraps too and cut out all the background in one go.

At this point, I was already getting excited. I mostly proceeded block by block, cutting one set of main fabrics at a time, sewing up the block, and then moving on. I started with dark pink:

Then came light pink, red, orange, yellow, and light green:

Some colors were easier than others (I don’t have many orange scraps) and I debated a lot about which shades to include. In the end, I opted for a bit more variety in tone and shade and I think it works. After I finished the rainbow log cabin quilt last weekend, I was ready to just wrap this one up. I decided to cut out the next 6 blocks in one go, so I could just sew them up as I had time. It turns out the cutting was taking way longer than making up the blocks.

Not only did I fussy cut half or more of the pieces for the quilt, I also started breaking down smaller scraps. I cut long 2.5″ strings, organized the leftovers, and also cut a charm square out of most fabrics. I would up with a really nice stack of charms… might need to make a rainbow patchwork quilt some time.

Anyway, back to the blocks. Next came dark green, aqua, light blue, blue, navy, and purple:

That last block picture is pretty unfortunate, but I just couldn’t wait to take a good picture. I finished the last block last night after supper and just kept on sewing until the top was done!

Eek! I am so proud! I really think the colors work well and I love the variation between the really saturated blocks versus the light blocks. Ugh, it’s so pretty. So, details. This is the Homespun Quilt by Modernly Morgan designs. I have to say, this pattern is AMAZING. She has full instructions for using fat quarters or yardage, but she also includes a great guide for making a scrappy version – let me tell you, that was a lifesaver. I would highly recommend this pattern, it is super easy for such a stunning effect. This one was fun.

Happy making!

Tying up loose ends.

It’s that time of year again, my friends. The air turns crisp (sort of, it’s Maryland after all), we’ve got pumpkins galore, and Christmas and New Year’s are nearly here. Now I know that sounds a bit crazy at the beginning of October but bear with me.

I tend to try to accomplish two goals towards the end of the year: knit holiday gifts and finish up WIPs. I like to have clean needles (of the knitting and sewing variety) come January, to varying degrees of success over the years. The crafty readers among you will know that this is no short order. It all takes time, and sometimes lots of it.

I spent a hot minute evaluating the current state of affairs: I’ve got a few long-really long-term projects going, several rather quick wins, holiday gifts, and a couple of upcoming projects. I’m limiting the new starts to the essentials, but there will be a few new projects coming down the line. With that, I was ready to finish up the projects that were just about done.

Anyway, I just dove right in and got started. Binding is kind of at the top of the list. I’ve gotten Astra’s Minecraft Quilt back from the quilter but I need to figure out how to finish that one in secret. The kid’s Christmas quilts will be back soon, so they’ll go on the binding pile as well. But I did have one project that’s been sitting around for months and I finally just up and did it.

It’s a tree skirt! I started this project back in January and just now got around to finishing it. This is the Joyful Jelly Roll Tree Skirt by Fat Quarter Shop – the top comes together pretty quickly with a whole lot of strip piecing. There are a lot of bias edges as you go which did give me some fuss, but I think the finished project turned out just fine.

I used a jelly roll in Little Tree by Lella Boutique, with Moda Bella Solids in Green Apple. I’m typically all about a fun backing but this one is going on the floor, so a solid seemed the way to go. The bias binding is also a Moda Bella Solid in a red I can’t recall. Nicole of Kwilt It! did a great job with the quilting. I’m kind of glad I waited to finish this because I wound up machine binding it. Knowing our cats, I feel as though this one might need to be washed a million times so we need durability on those edges.

If you follow me on instagram, you might have seen that I’ve been sewing along on the Quilter’s Cottage quilt by Lori Holt. I finished ahead of schedule, but have been waiting and waiting for a sunny day to get good picture that does it justice. Finally!

I really, truly enjoyed this project. It was so much fun to build each block step by step. I’m probably most proud of the cottage, so so cute! I used the kit, all in fun Vintage Happy 2 fabrics. Now I’ve got to ship it out to Nicole, and then it will go back on the list for binding.

Take a look at the left most quilt on the “clothesline” – cute, huh? Well the fun thing about that one is the method in the pattern makes a duplicate of each unit. Add to that the bonus pillow pattern that uses those hourglass blocks and I bet you can see where I’m going…

Cute, right? I love this pillow! I used up some scraps from the Quilter’s Cottage quilt and some Lori Holt stash to put this one together in an evening. It’s called the Quilter’s Quarters pillow; it finishes at 24.5″ square and has an envelope back. It’s as big as my chair but boy does it make for a cozy spot.

My final finish of this recent little flurry is my Waiting for Henry socks. I just cannot. They are so pretty! This is a pattern by Tabitha Gandee, I knit them up in the Eloise sock kit from Stress Knits. The main color is Eloise; contrast 1, heels, and toes is Sunflower; and contrast 2 is Pillowmint. This pattern was a joy and I love how they turned out!

Once these were done, I turned my attention to some holiday knitting. That will, as usual, stay secret but things are moving along. I’ve got one other project I’d like to finish up by the end of the year and it’s about 1/2 complete. Buckle your seatbelt, we’re going way back to the very, very start of lockdown when I cast on a sweater. The body is complete but we still need sleeves and a collar. It’s really been lanquishing, but I think I’m about ready to pick it back up again.

Well, that about does it for the end of the year plan. As the weather has gotten cooler it’s starting to feel a bit more natural to be holed up at home. Astra even had the idea to pretty up the front of the house with some fall flowers and pumpkins. We had a fun afternoon at the local produce stand and decorating outside. I’m usually doing quite a bit of travel in the fall, so this is a nice change of pace. Silver linings, eh?

Happy fall, y’all!


and happy making!

Super Secret Summer Sew

As you may have heard, this summer has not been what any of us expected. When last we spoke, I was deep into a sock fog and I’ll admit my knitting mojo has not come out of that haze yet.

One thing has happened as expected, Astra’s summer visit out of town. A few months ago, I saw a pattern on sewing blog that I just knew had to be made for Astra – but she’s probably the hardest to make a secret make for. The boys are easy, mostly because they sleep in, but my little early-riser is tougher. Enter the super secret summer sew: The Minecraft Quilt!

I gathered up the fabric and got started about a week after Astra left. The pattern is less of a pattern and more of a tutorial/guide from the Seriously… I think it needs stitches blog. I started with Steve and progressed on through. I made the face blocks in batches, cutting out 3 blocks at a time and chain piecing my little heart out.

It took me about a week to cut and piece all 20 face blocks. I did have a bit of advice from Joshua for a few modifications. Block 17 became Diamond Steve and block 18 subbed in the chicken. All in all I enjoyed the process quite a bit.

I knew I wanted to do the Ender Dragon for the back so I checked all my measurements when I was trying to decide on sashing and border widths. Turned out, unless the sashing was bizzarely wide – that dragon would be wider than the front of the quilt. And so I did what any normal quilter would do… I made more blocks for the front.

I decided we’d do her name down the side to widen it out a bit. Next came the dragon. Much like eating the proverbial elephant, the dragon came one bite at a time. The tutorial broke it down into three sections, with 10-15ish blocks in each section. I think the whole dragon alone was something like a 12 hour project. For reference he finished at 70″ wide and 27.5″ tall.

I finished this guy up last Sunday, and from there it was just sashing and borders for the front and a whole lot more purple for the back. In the middle of the week I picked up my new sewing machine and that made the final bit of the process fly. I’ve packed it all up and sent it off to be quilted. When I get it back, I’ll just need to spend a few nights hand sewing the binding before tucking it away for Christmas.

The top finished at 74″ x 80.5″ – a really generous throw. I used the recommended Moda Fabrics fat quarter bundle with a few scraps from my stash thrown in. I also purchased additional black, light, medium, and dark grey, and a ton of purple – all from Moda as well. The fat quarter bundle isn’t available any more but the list is provided here – I didn’t use all of the colors. I also used less than a half yard extra of the greys, an additional 3.75 yards black and about 5 yards total of purple.

Overall, I enjoyed the process and I’m super proud of how it came out and that I finished it and shipped it out before Astra’s home. I do have to say though, it was way out of my usual wheelhouse and I am beyond ready to get back to the pretty, floral lights and brights that I usually sew with. That was a lot of solid purple and black!


Happy {super secret} making!

The most fun I’ve had at a sewing machine.

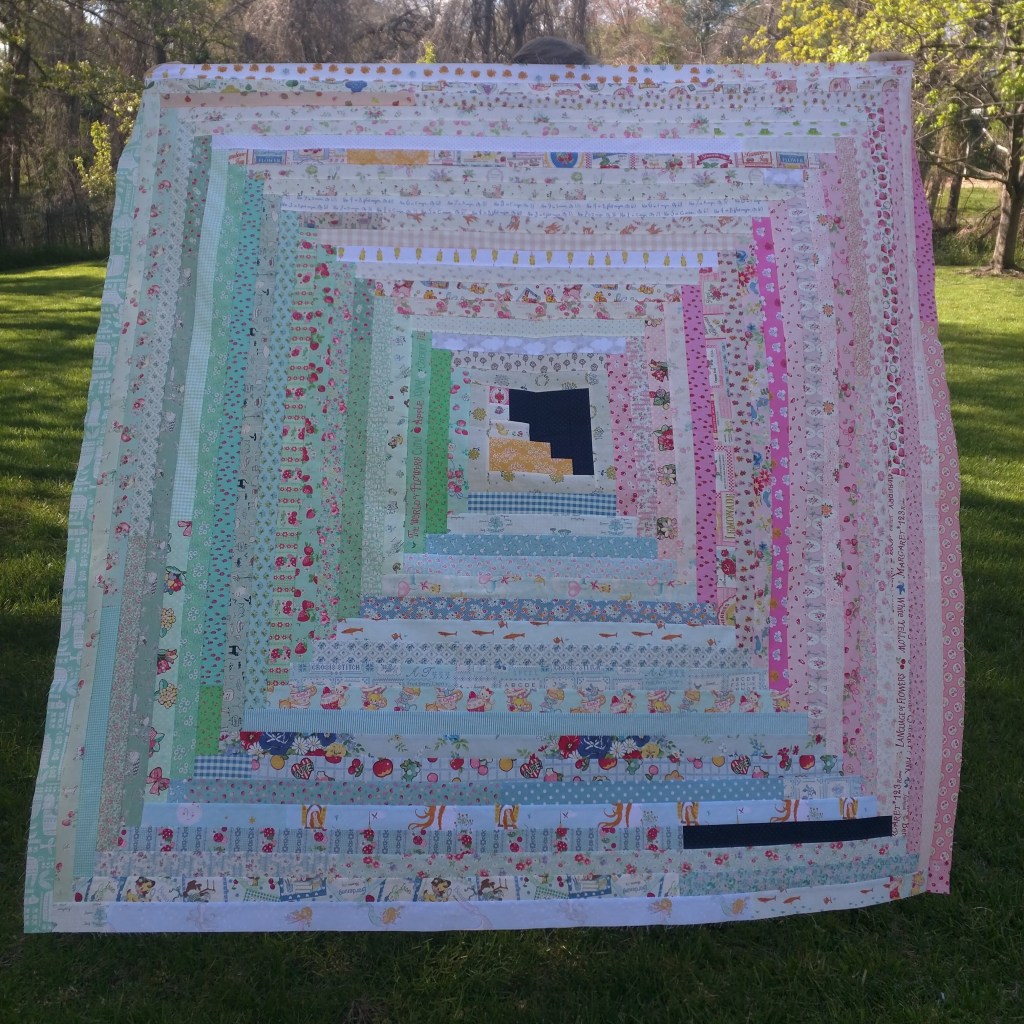
About a year ago, I spied a sew-along on instagram that took my heart. It was from the ladies of my favorite fabric shop, Sunny Day Supply, and was for a quilt called The Norah Quilt.

The quilt is simple: a single block log cabin. I’ve ooh-ed and ah-ed over all the Norahs out there and this year decided to join in. The sew-along started last Friday and I was off for the day, so I started early. I had already cut the fabric and was ready to play.

I decided to go similar to the original and do pink, neutral, mint, and blue for my logs with fussy cut, offset center. I got going on the center but wasn’t quite happy with how I started.

I realized I wanted more navy than yellow and this arrangement was going to give more yellow. So I unpicked all of the seams and started over. A wee rearrangement later, we were off to the races.

Things went pretty quickly at first, I honestly didn’t have much rhyme or reason but went round and round adding strips. I tried not to concentrate any one thing in an area: no pools of lights or darks, balanced large and small scale, that sort of thing. Over the last week, she grew and grew:

Until today, I headed outside to snap this quick in-progress picture and decided it was awfully close to plenty big enough. I wound up adding another 3 rows after this point and called her a day. The quilt top finished at 66″ square and is a crazy mish mash of fabrics. So much fun!


Happy making!